INTRODUCTION:
The Odroid N2 Amlogic S922X based device is a low cost (USD100) powerful media player when CoreElec/Kodi is installed. Its manufactured in South Korea by Hardkernel.
CoreElec is a ‘Just enough Operating System’ (tiny) Linux distribution for Kodi for popular Amlogic hardware (incl. Odroid N2). Once installed a user never sees any Linux screens, it starts very fast directly to the Kodi media player menu.
In fact you can run the N2/Kodi from a smart phone app or tablet without needing a screen and play music. Navigate your music from the smart phone or tablet.
The Odroid can read/play media from your USB drives and/or servers, NAS and PCs via an ethernet network (wifi too but that can have problems with 4K/1080p video and 192/24 MCH audio etc).
The Odroid N2 is a DIY device. You buy a few parts and do a tool-less assembly (very easy). Install CoreElec and you have a Media Player that plays 4K/1080p video and lossless high resolution multichannel audio (FLAC, PCM, DTS-HDMA, DTS, Dolby TrueHD, Atmos etc) via HDMI pass-through to your AVR.
Here's photos of the Odroid N2 being assembled. The N2 has RAM pre-installed. You only have to load Linux onto an SD-CARD, boot then transfer the SD-CARD image onto the internal eMMC (SSD) drive. Full install instructions later in this post.
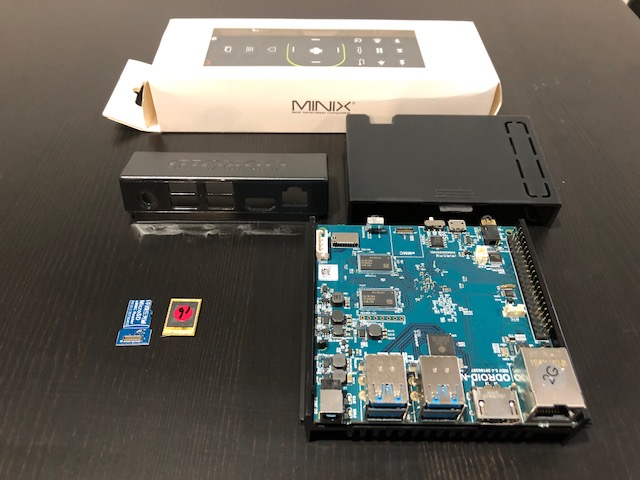
Picture 1: All the parts as shipped including plastic case. (There's also metal case available in US):
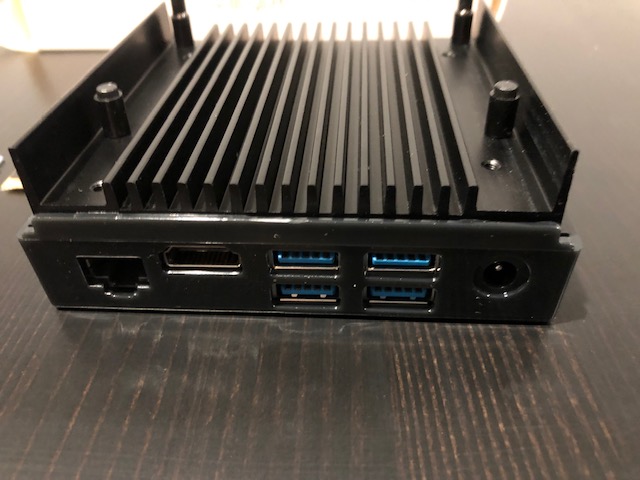
Picture 2: The Odroid N2 upside down showing the large metal heat sink, 4 x USB 3.0, HDMI and Ethernet ports.
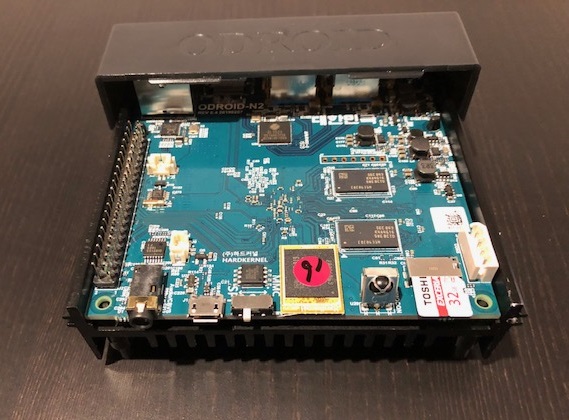
Picture 3: Shows the 16GB eMMC card plugged in (red dot) and Toshiba SD-CARD too (on right) - Stereo DAC output on left.
Once the SD card image is transferred to the eMMC its no longer required. Linux/Kodi runs off the eMMC drive (much faster than SD card).
One of the USB ports will be used for the Minix A2 wireless remote adapter.
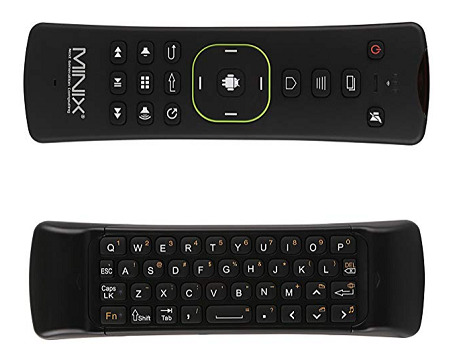
The Minix A2 Lite Remote: (Keyboard on back) - This is an RF remote and doesn't require a direct line of sight like an IR remote
PURCHASING:
You can by all the parts here:
USA: ODROID-N2
Europe: Odroid Operating System - 128GB eMMC Module C2 Android
Hardkerel direct: ODROID-N2 with 2GByte RAM – ODROID
Rest of World: Distributors – ODROID
EDIT: I added a link above to a French company selling the N2. ALSO: Odroid is now selling a ‘CoreElec’ kit which includes CoreElec (Linux with Kodi) pre-installed. I recommend getting the 16GB eMMC version (not SD card version), emmc is faster and more reliable long term.
Recommended Components (screen grab from Ameridroid US website cart):
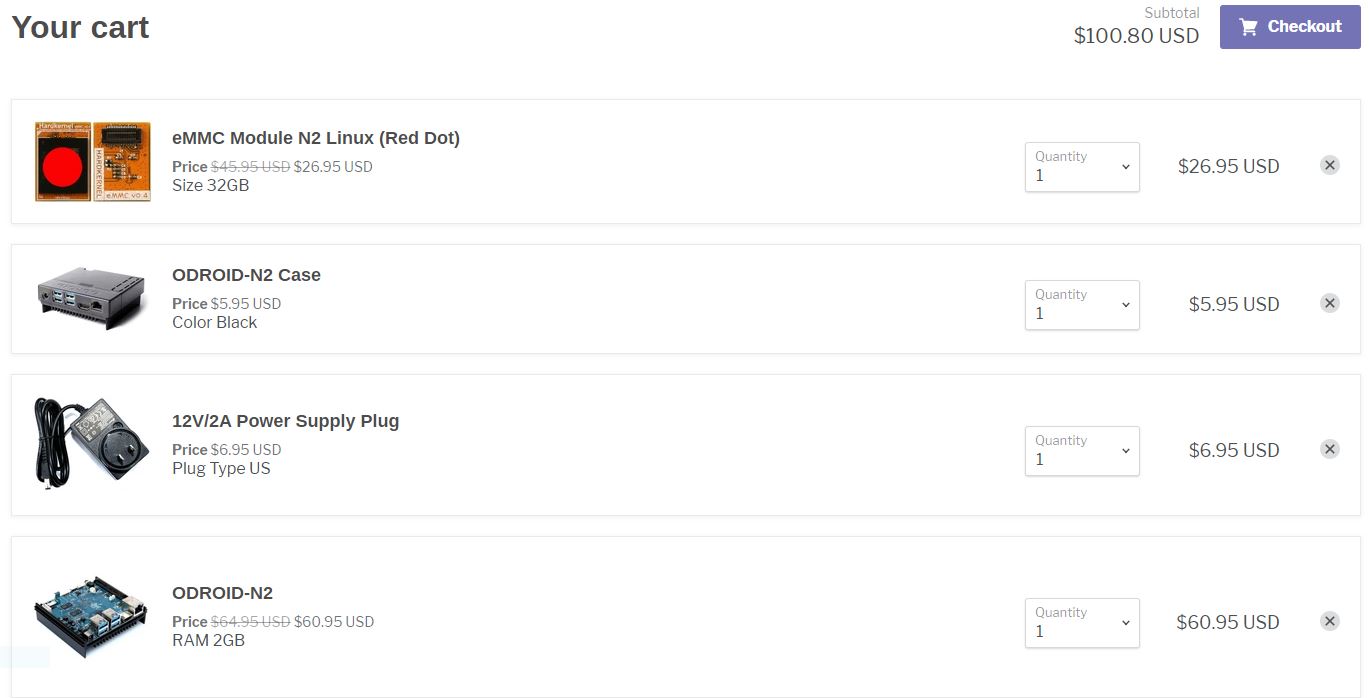
You can lower the cost by buying a 16GB eMMC drive card (its a bit slower than the 32GB), or you can run CoreElec/Kodi on an SD card (16GB) even cheaper, although SD cards are slower than eMMC drives.
You also need a small SD card (8GB or 16GB) to install CoreElec/Kodi on an eMMC drive
You will also need a USB keyboard or Remote control to operate the N2:
The Minix A2 Lite is a Radio Frequency remote with keyboard (highly recommended) - Get it fro Amazon:
https://www.amazon.com/MINIX-Keyboard-Six-Axis-Gyroscope-Technology/dp/B016OABW8S
You can also control Kodi via apps for smartphones and tablets.
HOW TO INSTALL COREELEC ON YOUR N2:
Requirements:
SD Card (8MB or larger)
A USB to SD-Card adapter (or a SD card reader on your PC)
An Odroid N2 with an eMMC drive (16MB, 32MB recommended as its faster than the 16MB)
A USB Keyboard/Mouse or suitable remote control (Minix A2 remote highly recommended)
Rufus program (Windows only) - This creates bootable USB drives from file images
Download from: Rufus - Official Website (Download, New Releases, Support)
CoreElec - This is a ‘Just enough OS’ (tiny) Linux distribution for Kodi for popular Amlogic hardware
Download from: CoreELEC - Select the 'Download' command on toolbar
You will see this screen:
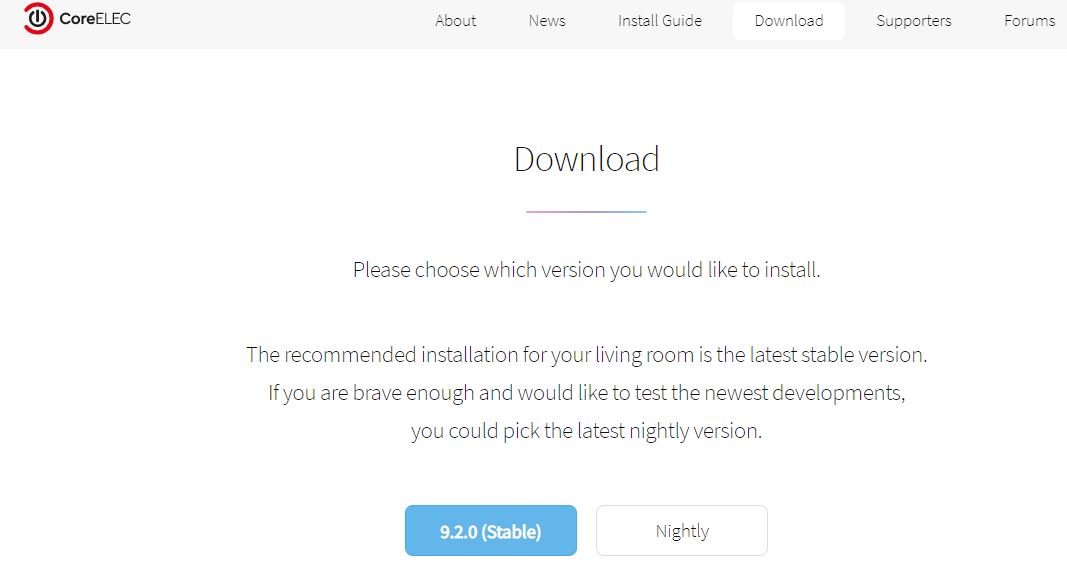
NOTE: At the time of writing this the current stable build is 9.2.0 - You should install the current Stable 9.2.1 or higher, go ahead and click that button and follow the prompts to select Amlogic Odroid N2.
Edit: The following is no longer applicable, no need to install the nightly build discussed immediately below:
If 9.2.0 showing as the current stable build Do Not download. Instead select 'Nightly’. You will see this screen:
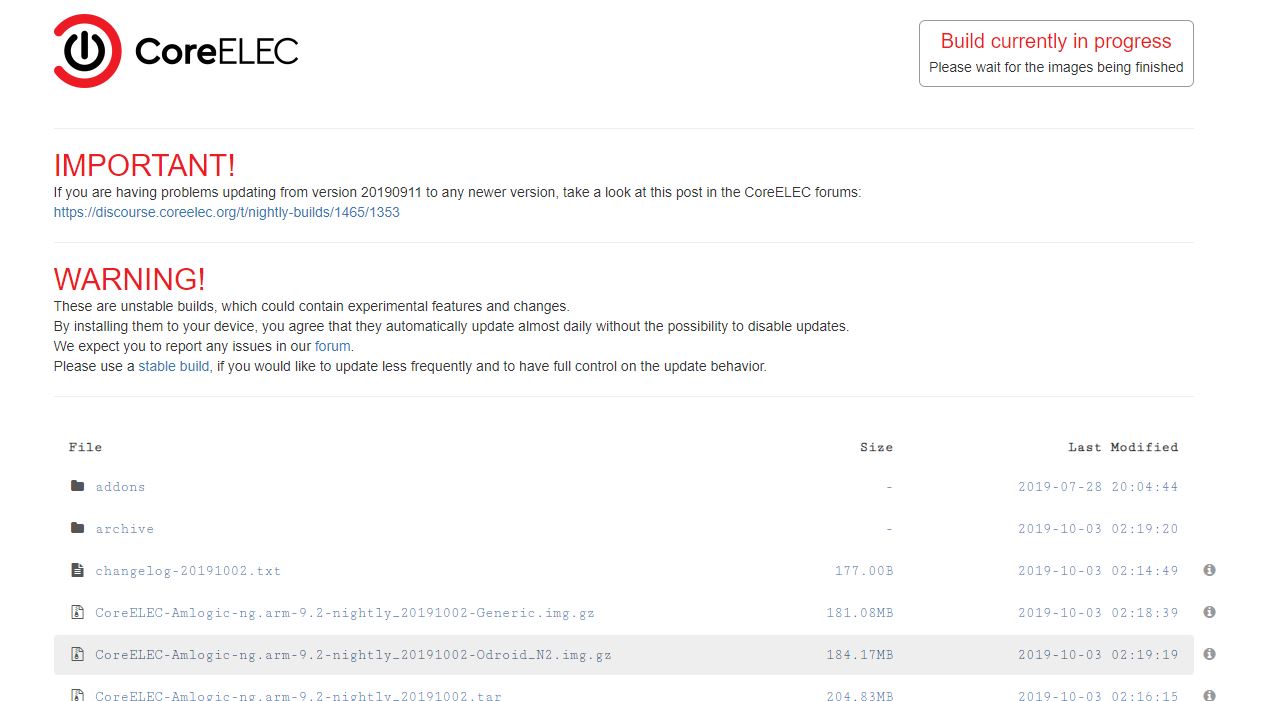
Then download the file containing the word: 'Odroid_N2' as shown (the date may be different to the one shown above)
STEP 1:
From your PC. Put your SD Card in the USB SD card adapter and insert in a USB socket (or insert your SD card directly in an SD card socket if your PC has one
Run Rufus
You will see your SD card in the Device list (ensure it is showing)
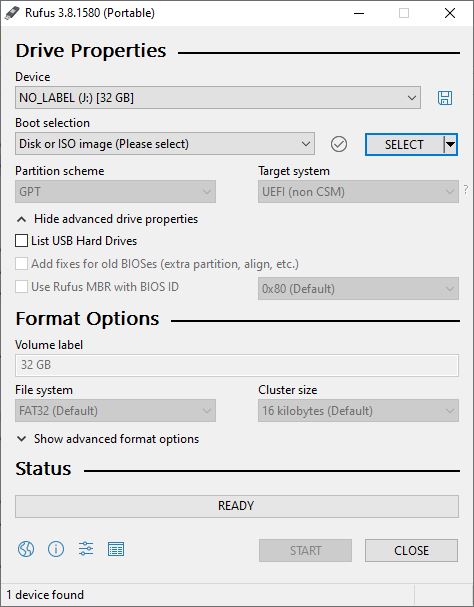
Use the 'SELECT' button to browse to and select your CoreElec image file you downloaded
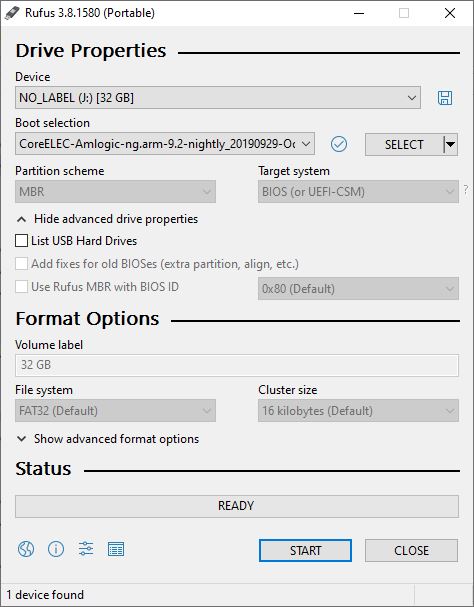
Click: 'START' button (this writes the CoreElec image to your SC card
When completed your SD card is now ready to use in your N2 media player
STEP 2:
Before powering on your N2, ensure you have not yet installed the eMMC drive.
Insert your SD Card (from STEP 1) into the SD Card slot (front right side, crd goes in connector side down)
Insert HDMI cable (N2) and into a PC monitor or TV screen (switch on screen or TV)
Insert ethernet cable connected to your network router
Insert the power plug plug into N2, plug in mains power adapter and swith on mains)
The N2 boots and processes the SD card image, extracting Linux, Kodi and driver files.
When completed the N2 auto-reboots into CoreElec and Kodi comes up. (CoreElec always boots directly to Kodi).
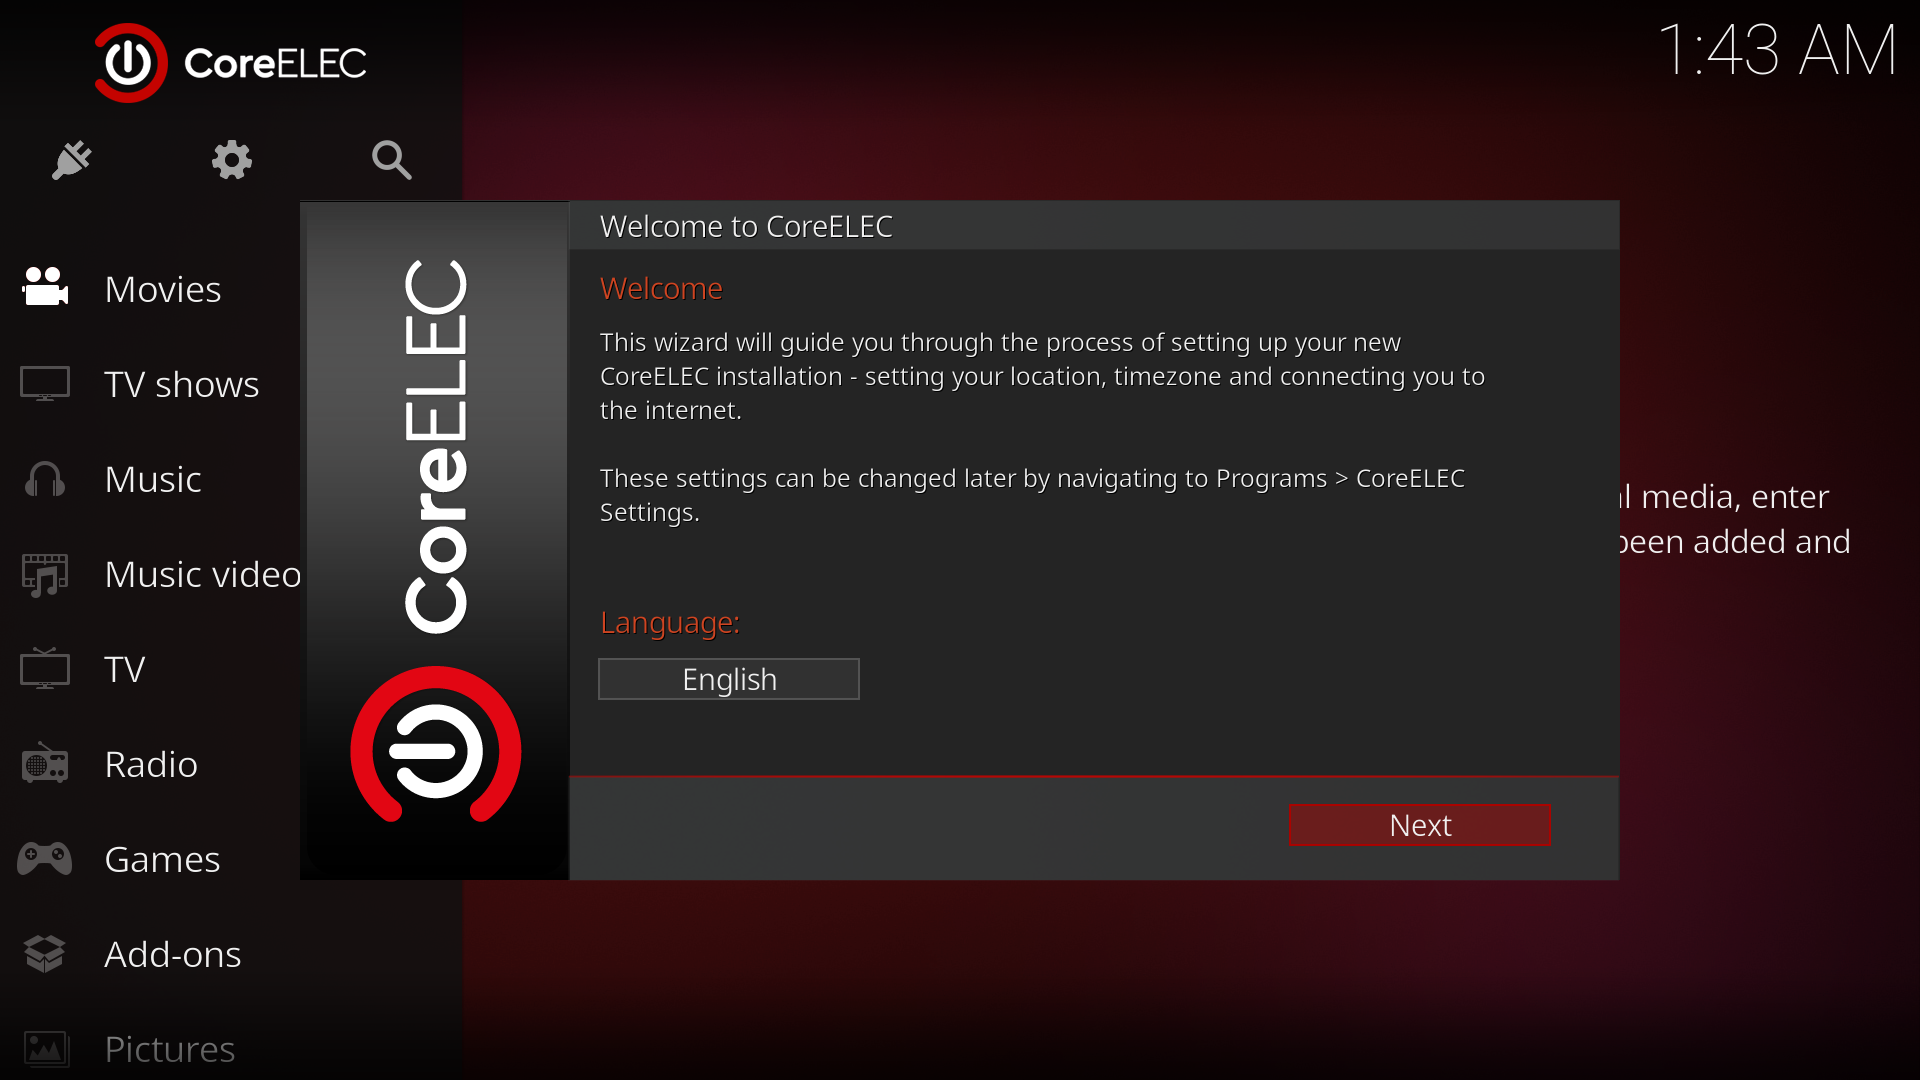
STEP 3:
Insert your remote control USB adapter or keyboard/mouse USB adapter into an N2 USB socket. Wait a few seconds for it to be recognized.
HINT: The Minix A2 USB adapter is inside one of the battery compartments
You should now be able to use the remote or mouse to navigate the Kodi menus.
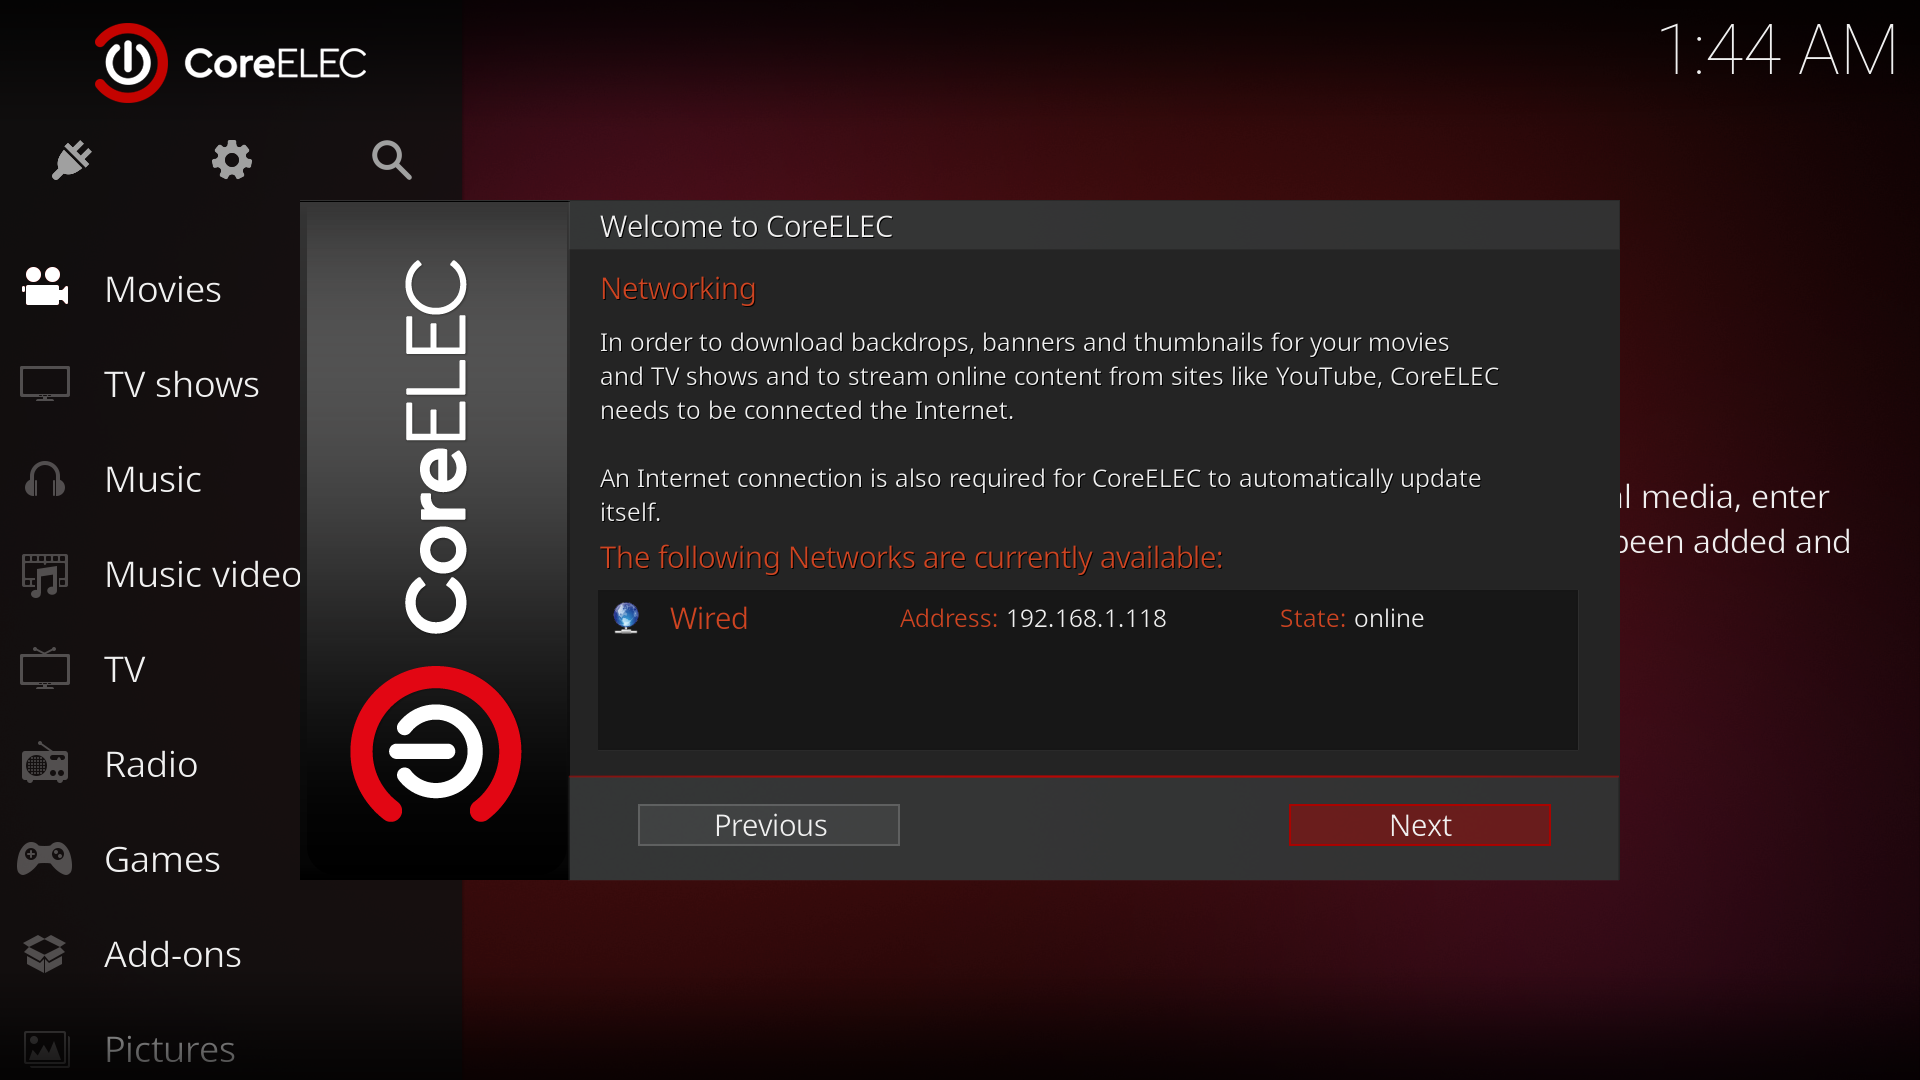
Please go through the initial setup wizard. Ensure you turn on SSH and note down the N2 IP Address on this screen.
And please enable SSH on this screen:
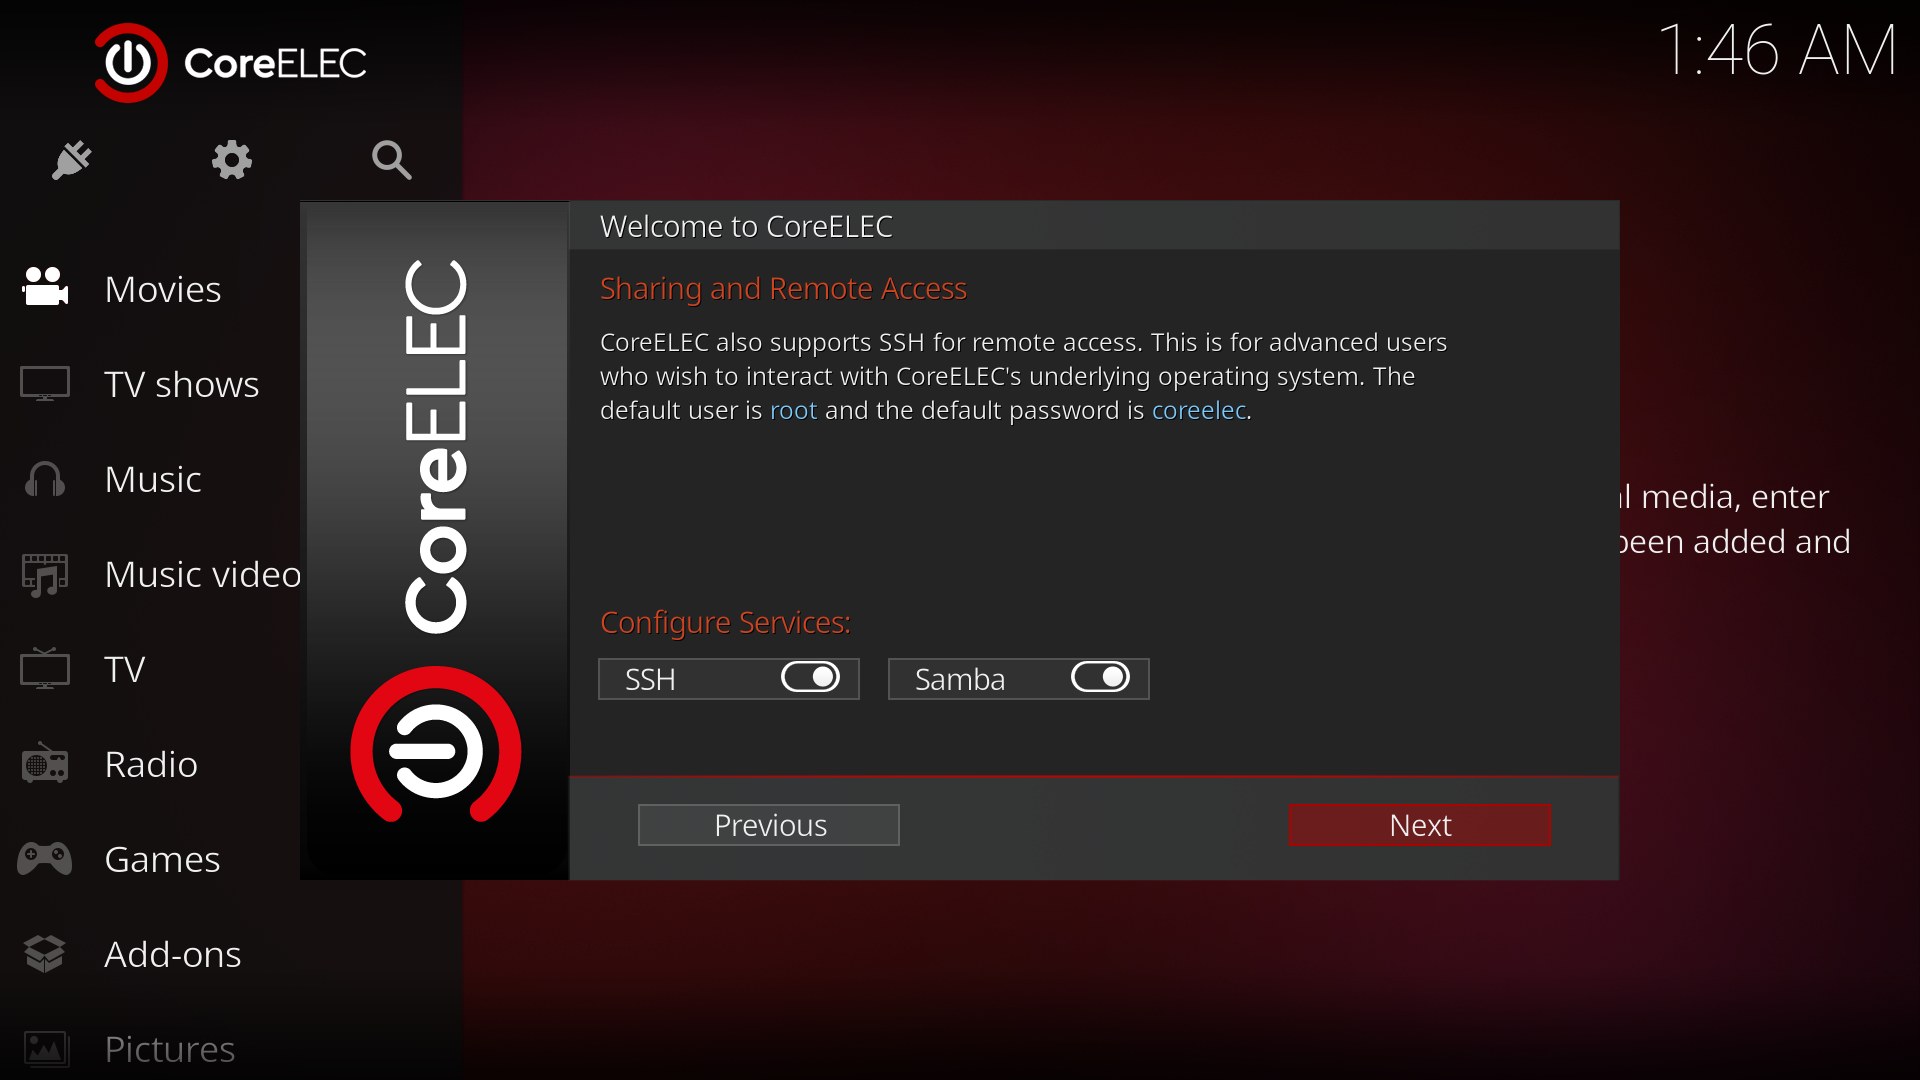
Leave the default login info: root/coreelec
You can now start using Kodi off the SD card, but everything will run faster/smoother if you install CoreElec/Kodi onto your eMMC card
STEP 4:
The CoreElec developers have added a nice command to auto transfer the CoreElec image from your SD card to the eMMC.
To do this you need to download a program called Putty to allow you to connect to your N2 from your PC and run commands
Download Putty from: Download PuTTY: latest release (0.73)
Ensure your N2 is on and connected to your network without the eMMC drive
Go ahead and install, then run Putty:
This is the Putty dialog, now enter the IP Adress of your N2 you wrote down in an earlier step: (mine is 192.168.1.118 in this screen)
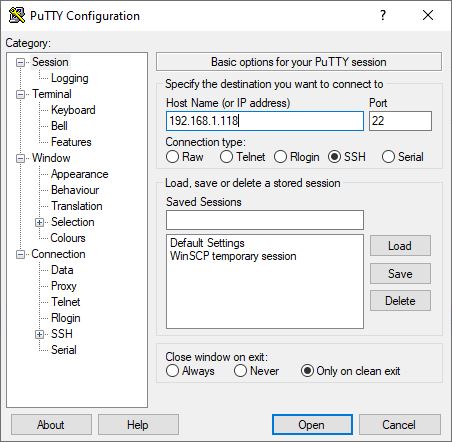
Click: Open, Putty will then pop-up a command-line interface and ask you to login:
Enter this:
User name: root
Password: coreelec
NOTE: All lower case. Linux is case sensitive!
Once logged in you will see this:
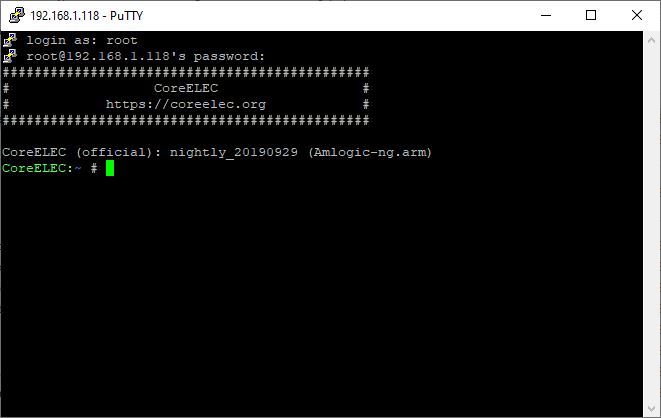
Enter this command: installtoemmc
when the N2 reboots you will have 30 seconds to attach the eMMC to the N2's motherboard (carefully align the socket and pins and press gently)
then when it finally comes back online, run Putty again, login and run installtoemmc one final time and it will install CoreELEC to the eMMC.
There are reports you may have o do this a 3rd time (but I didn't need to)
Now unplug the N2, remove the SD card, power it up again (without SD card) and you are now running CoreElec/Kodi from the eMMC drive
OK. That's it for installation.
Next Step: Setting up Kodi for multi-channel audio and HDR video
EDIT: June 14 2020 - You can now setup your N2 by Restoring a pre-configured Kodi Backup file I created. Read the How To information in this post:
https://www.quadraphonicquad.com/fo...o-play-mch-from-a-configuration-backup.28486/
EDIT: June 17 2020 - Using a smartphone or tablet to control Kodi
https://www.quadraphonicquad.com/forums/threads/kodi-using-a-iphone-ipad-to-control-kodi.28514/
The Odroid N2 Amlogic S922X based device is a low cost (USD100) powerful media player when CoreElec/Kodi is installed. Its manufactured in South Korea by Hardkernel.
CoreElec is a ‘Just enough Operating System’ (tiny) Linux distribution for Kodi for popular Amlogic hardware (incl. Odroid N2). Once installed a user never sees any Linux screens, it starts very fast directly to the Kodi media player menu.
In fact you can run the N2/Kodi from a smart phone app or tablet without needing a screen and play music. Navigate your music from the smart phone or tablet.
The Odroid can read/play media from your USB drives and/or servers, NAS and PCs via an ethernet network (wifi too but that can have problems with 4K/1080p video and 192/24 MCH audio etc).
The Odroid N2 is a DIY device. You buy a few parts and do a tool-less assembly (very easy). Install CoreElec and you have a Media Player that plays 4K/1080p video and lossless high resolution multichannel audio (FLAC, PCM, DTS-HDMA, DTS, Dolby TrueHD, Atmos etc) via HDMI pass-through to your AVR.
Here's photos of the Odroid N2 being assembled. The N2 has RAM pre-installed. You only have to load Linux onto an SD-CARD, boot then transfer the SD-CARD image onto the internal eMMC (SSD) drive. Full install instructions later in this post.
Picture 1: All the parts as shipped including plastic case. (There's also metal case available in US):

Picture 2: The Odroid N2 upside down showing the large metal heat sink, 4 x USB 3.0, HDMI and Ethernet ports.

Picture 3: Shows the 16GB eMMC card plugged in (red dot) and Toshiba SD-CARD too (on right) - Stereo DAC output on left.

Once the SD card image is transferred to the eMMC its no longer required. Linux/Kodi runs off the eMMC drive (much faster than SD card).
One of the USB ports will be used for the Minix A2 wireless remote adapter.
The Minix A2 Lite Remote: (Keyboard on back) - This is an RF remote and doesn't require a direct line of sight like an IR remote

PURCHASING:
You can by all the parts here:
USA: ODROID-N2
Europe: Odroid Operating System - 128GB eMMC Module C2 Android
Hardkerel direct: ODROID-N2 with 2GByte RAM – ODROID
Rest of World: Distributors – ODROID
EDIT: I added a link above to a French company selling the N2. ALSO: Odroid is now selling a ‘CoreElec’ kit which includes CoreElec (Linux with Kodi) pre-installed. I recommend getting the 16GB eMMC version (not SD card version), emmc is faster and more reliable long term.
Recommended Components (screen grab from Ameridroid US website cart):

You can lower the cost by buying a 16GB eMMC drive card (its a bit slower than the 32GB), or you can run CoreElec/Kodi on an SD card (16GB) even cheaper, although SD cards are slower than eMMC drives.
You also need a small SD card (8GB or 16GB) to install CoreElec/Kodi on an eMMC drive
You will also need a USB keyboard or Remote control to operate the N2:
The Minix A2 Lite is a Radio Frequency remote with keyboard (highly recommended) - Get it fro Amazon:
https://www.amazon.com/MINIX-Keyboard-Six-Axis-Gyroscope-Technology/dp/B016OABW8S
You can also control Kodi via apps for smartphones and tablets.
HOW TO INSTALL COREELEC ON YOUR N2:
Requirements:
SD Card (8MB or larger)
A USB to SD-Card adapter (or a SD card reader on your PC)
An Odroid N2 with an eMMC drive (16MB, 32MB recommended as its faster than the 16MB)
A USB Keyboard/Mouse or suitable remote control (Minix A2 remote highly recommended)
Rufus program (Windows only) - This creates bootable USB drives from file images
Download from: Rufus - Official Website (Download, New Releases, Support)
CoreElec - This is a ‘Just enough OS’ (tiny) Linux distribution for Kodi for popular Amlogic hardware
Download from: CoreELEC - Select the 'Download' command on toolbar
You will see this screen:

NOTE: At the time of writing this the current stable build is 9.2.0 - You should install the current Stable 9.2.1 or higher, go ahead and click that button and follow the prompts to select Amlogic Odroid N2.
Edit: The following is no longer applicable, no need to install the nightly build discussed immediately below:
If 9.2.0 showing as the current stable build Do Not download. Instead select 'Nightly’. You will see this screen:

Then download the file containing the word: 'Odroid_N2' as shown (the date may be different to the one shown above)
STEP 1:
From your PC. Put your SD Card in the USB SD card adapter and insert in a USB socket (or insert your SD card directly in an SD card socket if your PC has one
Run Rufus
You will see your SD card in the Device list (ensure it is showing)

Use the 'SELECT' button to browse to and select your CoreElec image file you downloaded

Click: 'START' button (this writes the CoreElec image to your SC card
When completed your SD card is now ready to use in your N2 media player
STEP 2:
Before powering on your N2, ensure you have not yet installed the eMMC drive.
Insert your SD Card (from STEP 1) into the SD Card slot (front right side, crd goes in connector side down)
Insert HDMI cable (N2) and into a PC monitor or TV screen (switch on screen or TV)
Insert ethernet cable connected to your network router
Insert the power plug plug into N2, plug in mains power adapter and swith on mains)
The N2 boots and processes the SD card image, extracting Linux, Kodi and driver files.
When completed the N2 auto-reboots into CoreElec and Kodi comes up. (CoreElec always boots directly to Kodi).

STEP 3:
Insert your remote control USB adapter or keyboard/mouse USB adapter into an N2 USB socket. Wait a few seconds for it to be recognized.
HINT: The Minix A2 USB adapter is inside one of the battery compartments
You should now be able to use the remote or mouse to navigate the Kodi menus.
Please go through the initial setup wizard. Ensure you turn on SSH and note down the N2 IP Address on this screen.

And please enable SSH on this screen:

Leave the default login info: root/coreelec
You can now start using Kodi off the SD card, but everything will run faster/smoother if you install CoreElec/Kodi onto your eMMC card
STEP 4:
The CoreElec developers have added a nice command to auto transfer the CoreElec image from your SD card to the eMMC.
To do this you need to download a program called Putty to allow you to connect to your N2 from your PC and run commands
Download Putty from: Download PuTTY: latest release (0.73)
Ensure your N2 is on and connected to your network without the eMMC drive
Go ahead and install, then run Putty:
This is the Putty dialog, now enter the IP Adress of your N2 you wrote down in an earlier step: (mine is 192.168.1.118 in this screen)

Click: Open, Putty will then pop-up a command-line interface and ask you to login:
Enter this:
User name: root
Password: coreelec
NOTE: All lower case. Linux is case sensitive!
Once logged in you will see this:

Enter this command: installtoemmc
when the N2 reboots you will have 30 seconds to attach the eMMC to the N2's motherboard (carefully align the socket and pins and press gently)
then when it finally comes back online, run Putty again, login and run installtoemmc one final time and it will install CoreELEC to the eMMC.
There are reports you may have o do this a 3rd time (but I didn't need to)
Now unplug the N2, remove the SD card, power it up again (without SD card) and you are now running CoreElec/Kodi from the eMMC drive
OK. That's it for installation.
Next Step: Setting up Kodi for multi-channel audio and HDR video
EDIT: June 14 2020 - You can now setup your N2 by Restoring a pre-configured Kodi Backup file I created. Read the How To information in this post:
https://www.quadraphonicquad.com/fo...o-play-mch-from-a-configuration-backup.28486/
EDIT: June 17 2020 - Using a smartphone or tablet to control Kodi
https://www.quadraphonicquad.com/forums/threads/kodi-using-a-iphone-ipad-to-control-kodi.28514/
Last edited:


